
Reagents:
Molecular Biology
Biochemistry
Cell Biology
ELISA / Diagnostic Kits
Antibody
Serum/Medium
Other Reagents

- Human CALP ELISA Kit

- Product Detail
- Company Profile
Product Specification
| Usage | Required experimental equipment: 1. Microplate reader (450nm) 2. High-precision pipettes and pipette tips: 0.5-10uL, 5-50uL, 20-200uL, 200-1000uL 3. 37°C incubator 4. Distilled or deionized water Sample handling and requirements: The detection range of the kit is not equivalent to the concentration range of the analyte in the sample. Before the experiment, it is recommended to estimate the concentration of the analyte in the sample based on relevant literature and conduct preliminary experiments to determine the actual concentration of the sample. If the concentration of the analyte in the sample is too high or too low, dilute or concentrate the sample appropriately. Stool storage: Stool samples should be collected in flat-bottomed test tubes and stored at 2-8°C for 6 days. Freezing stool samples will increase the calprotectin test value. If the sample needs to be stored for a long time, it is recommended to extract it first, then divide it into several tubes and store it at -20°C. It can be stored stably for at least 4 months. Fecal extraction: For each extraction, we recommend weighing 50-100 mg of fresh stool and adding 1 x 1 volume of extraction solution at a 1:19 (g:mL) ratio (for example, weigh 100 mg of stool and add 1.9 mL of 1 x 1 volume of extraction solution. The final sample concentration should be multiplied by the extraction dilution factor of 20). Cap the tube and mix thoroughly using a high-speed vortex mixer at maximum speed for 10-30 minutes. Transfer the mixed sample to a 2 mL microcentrifuge tube and centrifuge at 10,000 x g for 5 minutes. Aliquot the supernatant and store at -20°C for up to 4 months. If individual samples exceed or fall below the detection limit, we recommend adjusting the dilution factor and retesting. Serum: Collect whole blood in a serum separator tube at room temperature for 2 hours or at 4°C overnight, then centrifuge at 1000×g for 20 minutes. Remove the supernatant for analysis, or store at -20°C or -80°C. Avoid repeated freezing and thawing. Plasma: Collect the specimen using EDTA or heparin as an anticoagulant. Centrifuge at 1000×g for 15 minutes at 2-8°C within 30 minutes of collection. Remove the supernatant for analysis, or store at -20°C or -80°C. Avoid repeated freezing and thawing. Tissue homogenate: Rinse the tissue with pre-chilled PBS (0.01M, pH 7.4) to remove residual blood (lysed red blood cells in the homogenate may affect the measurement results). Weigh and mince the tissue. Mix the minced tissue with the appropriate volume of PBS (generally a 1:9 weight-to-volume ratio, e.g., 1g of tissue sample to 9mL of PBS. The specific volume can be adjusted according to experimental needs and recorded. It is recommended to add protease inhibitors to the PBS) in a glass homogenizer and grind thoroughly on ice. To further lyse tissue cells, the homogenate can be sonicated or repeatedly freeze-thawed. Finally, centrifuge the homogenate at 5000×g for 5-10 minutes and remove the supernatant for analysis. Cell culture supernatant: Centrifuge at 1000×g for 20 minutes. Remove the supernatant for analysis or store at -20°C or -80°C, but avoid repeated freeze-thaw cycles. Other biological fluids: Centrifuge at 1000×g for 20 minutes and remove the supernatant for analysis. Sample Dilution Scheme: Please estimate the sample concentration range in advance. If your test sample requires dilution, the following dilution scheme is recommended: 100-fold dilution: One-step dilution. Add 5 μL of sample to 495 μL of universal diluent for a 100-fold dilution. 1000-fold dilution: Two-step dilution. Add 5 μL of sample to 95 μL of universal diluent for a 20-fold dilution. Then, add 5 μL of the 20-fold diluted sample to 245 μL of universal diluent for a 50-fold dilution, for a total of 1000-fold dilution. 100,000-fold dilution: Three-step dilution. Add 5 μL of sample to 195 μL of universal diluent and dilute 40-fold. Then, add 5 μL of the 40-fold diluted sample to 245 μL of universal diluent and dilute 50-fold. Finally, add 5 μL of the 2,000-fold diluted sample to 245 μL of universal diluent and dilute 50-fold, for a total dilution of 100,000-fold. For each dilution step, add at least 3 μL of solution, and the dilution factor should not exceed 100-fold. Mix thoroughly at each dilution step to avoid foaming. Pre-test Preparation: 1. Remove the test kit from the refrigerator 10 minutes in advance and equilibrate to room temperature. 2. Prepare a gradient standard working solution: Add 1 mL of universal diluent to the lyophilized standard. Let stand for 15 minutes to completely dissolve, then gently mix (concentration 720 ng/mL). Then dilute to the following concentrations: 720 ng/mL, 360 ng/mL, 180 ng/mL, 90 ng/mL, 45 ng/mL, 22.5 ng/mL, 11.25 ng/mL, and 0 ng/mL. Serial dilution method: Take seven EP tubes and add 500 μL of universal diluent to each tube. Pipette 500 μL of the 720 ng/mL standard working solution into the first EP tube and mix thoroughly to make a 360 ng/mL standard working solution. Repeat this procedure for subsequent tubes. The last tube serves as a blank well; there is no need to pipette liquid from the penultimate tube. See the figure below for details. 3. Preparation of biotinylated detection antibody working solution: 15 minutes before use, centrifuge the concentrated biotinylated antibody at 1000×g for 1 minute. Dilute the 100× concentrated biotinylated antibody to a 1× working concentration with universal diluent (e.g., 10 μL concentrate + 990 μL universal diluent). Prepare and use immediately. 4. Preparation of the enzyme conjugate working solution: 15 minutes before use, centrifuge 100 μL of concentrated enzyme conjugate at 1000 × g for 1 minute. Dilute the 100 μL concentrated HRP conjugate with universal diluent to a 1 μL working concentration (e.g., 10 μL of concentrate + 990 μL of universal diluent). Prepare freshly prepared extract solution. 5. Preparation of the 1 μL extract solution: Dissolve 10 mL of the 20 μL extract solution in 190 mL of distilled water. (The concentrated extract solution may crystallize after removal from the refrigerator. This is normal. Allow to stand at room temperature and gently shake until the crystals are completely dissolved before reconstitution.) 6. Preparation of 1× Wash Buffer: Dissolve 10 mL of 20× Wash Buffer in 190 mL of distilled water (Concentrated Wash Buffer removed from the refrigerator may crystallize, which is normal. Allow to stand at room temperature until the crystals have completely dissolved before preparing the buffer). Procedure: 1. Remove the desired strips from the aluminum foil bag after equilibration at room temperature for 10 minutes. Seal the remaining strips in a ziplock bag and return them to 4°C. 2. Sample Loading: Add 100 μL of sample or standard of varying concentrations to the appropriate wells. Add 100 μL of Universal Diluent to the blank wells. Cover with a film sealer and incubate at 37°C for 60 minutes. (Recommendation: Dilute the sample to be tested at least 1-fold with Universal Diluent before loading into the plate. This minimizes matrix effects on the test results. When calculating the sample concentration, multiply by the dilution factor. It is recommended to run replicates for all samples and standards.) 3. Adding Biotinylated Antibody: Remove the ELISA plate, discard the liquid, and do not wash. Add 100 μL of biotinylated antibody working solution directly to each well. Cover with a sealing film and incubate at 37°C for 60 minutes. 4. Washing: Discard the liquid and add 300 μL of 1x Wash Buffer to each well. Let stand for 1 minute. Shake off the wash solution and pat dry on absorbent paper. Repeat this process three times (a microplate washer can also be used). 5. Adding Enzyme Conjugate Working Solution: Add 100 μL of enzyme conjugate working solution to each well. Cover with a sealing film and incubate at 37°C for 30 minutes. 6. Washing: Discard the liquid and wash the plate five times as in step 4. 7. Adding Substrate: Add 90 μL of substrate (TMB) to each well. Cover with a sealing film and incubate at 37°C in the dark for 15 minutes. 8. Add Stop Solution: Remove the ELISA plate and add 50 μL of Stop Solution directly to each well. Immediately measure the OD value of each well at a wavelength of 450 nm. Calculation of Experimental Results: Result Interpretation: 1. Calculate the average OD value of the standard and sample replicates and subtract the OD value of the blank well as a correction value. Plot a four-parameter logistic function standard curve on double-logarithmic graph paper, with concentration as the horizontal axis and OD value as the vertical axis. 2. If the sample OD value is above the upper limit of the standard curve, dilute the sample appropriately and re-measure. Multiply the sample concentration by the corresponding dilution factor. 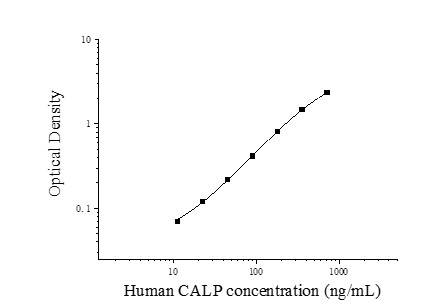 | |||||||||||||||||||||||||||||||||||
| Sensitivity | 6.1 ng/mL | |||||||||||||||||||||||||||||||||||
| Theory | This kit uses a double-antibody sandwich enzyme-linked immunosorbent assay (ELISA). Samples, standards, biotin-labeled detection antibodies, and HRP conjugates are sequentially added to microwells pre-coated with human calprotectin (CALP) capture antibodies. After incubation and washing, the sample is developed with the substrate TMB. TMB converts to blue under the catalysis of HRP and to yellow under the action of acid. The intensity of the color is positively correlated with the amount of human calprotectin (CALP) in the sample. The absorbance (OD) is measured at 450 nm using a microplate reader to calculate the sample concentration. | |||||||||||||||||||||||||||||||||||
| Source | Human | |||||||||||||||||||||||||||||||||||
| Synonym | Human Calprotectin ELISA Kit | |||||||||||||||||||||||||||||||||||
| Detection Type | Double antibody sandwich method | |||||||||||||||||||||||||||||||||||
| Composition |
| |||||||||||||||||||||||||||||||||||
| Background | Calprotectin (CALP) is a calcium-binding protein (approximately 36 kDa) produced by neutrophils, constituting 5% of total cellular protein. It exhibits tissue- or cell-specific properties and serves as a marker of acute inflammatory cell activation. It is composed of a calcium-binding protein heterotrimer covalently linked by two 14 kDa heavy chains and one 8 kDa light chain. It exhibits heat resistance and enhanced hydrolysis resistance. It was first isolated from neutrophils by Fagerhol et al. in 1980 and named L1 protein. Dorin and Freemont et al. further confirmed that this protein shares structural features with the S-100 protein and subsequently named this protective, multifunctional, calcium-binding protein calprotectin. | |||||||||||||||||||||||||||||||||||
| General Notes | 1. Strictly adhere to the specified incubation time and temperature to ensure accurate results. All reagents must be at room temperature (20-25°C) before use. Refrigerate reagents immediately after use. 2. Improper plate washing may result in inaccurate results. Ensure that all liquid in the wells is aspirated thoroughly before adding substrate. Do not allow the wells to dry out during incubation. 3. Remove any residual liquid and fingerprints from the bottom of the plate, as this will affect the OD value. 4. The substrate developer solution should be colorless or very light in color. Do not use substrate solution that has turned blue. 5. Avoid cross-contamination of reagents and specimens to prevent erroneous results. 6. Avoid direct exposure to strong light during storage and incubation. 7. Do not expose any reagents to bleaching solvents or the strong fumes emitted by bleaching solvents. Any bleaching agent will destroy the biological activity of the reagents in the kit. 8. Do not use expired products, and do not mix components with different product numbers and batches. 9. Recombinant proteins from sources other than the kit may not be compatible with the antibodies in this kit and will not be recognized. 10. If there is a possibility of disease transmission, all samples should be managed properly and samples and testing devices should be handled according to prescribed procedures. | |||||||||||||||||||||||||||||||||||
| Storage Temp. | If the unopened kit is stored at 4°C, the shelf life is 6 months. | |||||||||||||||||||||||||||||||||||
| Test Range | 11.25-720 ng/mL | |||||||||||||||||||||||||||||||||||
| Applications | Serum, plasma, tissue homogenates, cell culture supernatants, stool samples, and other biological fluids |
-
AntBio is a biotechnology group company dedicated to serving life sciences, aiming to help scientists accelerate research and improve work efficiency. AntBio provides comprehensive and high-quality reagent tools for basic research, drug development, and diagnosis, including research grade antibodies, proteins, biochemical reagents, and assay kits. These research tools are widely used in different segments of life science research. The group company currently consists of three brands, Absin, Starter-Bio and UA-Bio.
| Request Information |
| Other Products |
| Related Products |
| Recently viewed products |